Full Text
Introduction
Hernia (Greek kele/hernios--bud or offshoot) was present in the human history from its very beginning. The oldest epoch was ancient era from ancient Egypt to 15th century. The Egyptian Papyrus of Ebers contains description of a hernia [1]. One of the first attempts to solve inguinal hernia by the means of surgical knife came from the famous XVI century Italian anatomist, Gabriele Fallopio [2]. Historically, incisional hernias were repaired with either primary suture techniques or placement of a variety of prosthetic materials. Stock was the first to recognize the potential of using Nylon mesh for hernia repair. His initial cases were successful and led Notaras to report on the use of Mersilene mesh, a braided polyester fibre, for the repair of incisional hernia [3].
Incisional hernia repair has been a challenge to surgeons over decades. Several ways of repair have been tried but the recurrences continue to haunt the patients and their surgeons. It is generally accepted that mesh reinforcement of the hernial defect is necessary to prevent recurrence. A variety of techniques are in vogue in placing the mesh in different locations; sublay, inlay and onlay etc. Open, minimal access and hybrid procedures have been described. The regular mesh coming in contact with bowel will lead to adhesions and fistulation. The surgeon is thus obliged to close the hernial defect and reinforce the area with a mesh. It is common practice both in laparoscopic and open hernia repair techniques to close the fascia in the midline and place the mesh in sublay or onlay fashion. Covered meshes are used to overcome this issue in laparoscopic IPOM (Intra peritoneal onlay mesh) method. These meshes or the fixation devices are not completely free from complications. Recently e-TEP (Extended totally extra peritoneal) repair and Rives Stoppa repair are gaining popularity. These also require various component separation techniques, to achieve the fascial closure in the midline. One of the major disadvantages of component separation is weakening of the transversalis fascia laterally and potential herniation [4]. Fascial closure invariably is associated with some tension in the suture line. Another issue is the large redundant panniculus in majority of these patients which is not taken care of in the existing techniques. Very few studies are found in the literature that combine incisional hernia repair with removal of the redundant abdominal panniculus.
Method
The technique that is being described evolved over a period of time and came to the final version around 2006. To give unique identity to this technique, it is named after the author i.e., Mallipudi hernioplasty. Institutional ethical committee approval was sought, and informed consent was obtained from all the patients as per extant hospital policy.
The key differences in this technique, compared to the available techniques, are (1) No attempt is made to close the fascial defect, (2) Hernial sac is used to separate the mesh from viscera and (3) Lax abdominal skin is excised, usually through a suprapubic transverse elliptical incision. Thus, it is a combination of using peritoneal flap (hernia sac), and mesh placement using a combination of inlay and onlay methods. Additionally, sub umbilical panniculectomy is done in suitable patients.
Preoperative preparation
All patients are worked up preoperatively depending on the age and co-morbid conditions. All patients get imaging in the form of ultrasonography and/or CT (Computerized tomographic) scan of the abdomen. Patients are counselled regarding the procedure and informed consent taken. Calf muscle exercises and incentive spirometry are taught prior to admission. Broad-spectrum antibiotics (Cefotaxime 1 gram intravenously at induction and continued post operatively twice a day for 5 days), graduated compression stockings and fractionated Heparin (provided there are no contraindications) are given to all patients. Urinary catheterization is done for patients with sizable hernial defects. Unless there are any contra indications, all surgeries are performed under general anesthesia with endo-tracheal intubation.
Concomitant cholecystectomy can be performed for patients having co-existing symptomatic gallstones. Patients having incidental gallstones are counselled and offered cholecystectomy. Cholecystectomy is usually performed laparoscopically taking extra precautions not to spill the contents and using a specimen retrieval bag. Once the cholecystectomy is done, painting and draping is done again. Co-existing gynecological pathology (ovarian cysts or hydro salpinx) can be dealt with, through the hernia defect or by enlarging the defect when necessary.
Operative procedure
Majority of the patients are multiparous females having sub umbilical hernias following gynecological surgery or caesarian section. In these patients, a supra pubic elliptical incision is given. Incision is marked using indelible marker to remove all the redundant skin and fat but without tension in the flaps (Figure 1a & b). Previous transverse scar is included in the incision and excised. Note the shape of the incision at the lateral ends. This incision reduces the chances of “dog ears” at the time of closure compared to simple elliptical incision. If the previous scar is vertical, part of it is included in the horizontal incision and excised, as necessary. It is always better to err on leaving excess skin, which can be trimmed later, if necessary, rather than removing too much skin initially.
This incision is most commonly used. Rarely, if the midline scar is too thin, this may be excised further by making the incision into an inverted “T” configuration (Figure 2a & b). However, the skin incision needs to be tailored to each patient, depending on the size & location of the hernia and the previous scars. In patients having the hernial defect close to the umbilicus or in the supra umbilical region, the incision is modified. Either a transverse or a vertical elliptical incision is used. If there is not much loose panniculus, excising the previous scar and the underlying subcutaneous fat is enough. It is to be noted that removal of loose panniculus is a matter of convenience only and does not alter the technique of hernia repair. Attempt should be made to preserve the umbilicus without compromising the blood supply. Where necessary, the umbilicus may be sacrificed with prior consent of the patient. Please note that the skin incision is independent of the subsequent repair that is done for the hernia.

Figure 1a: Marking of skin incision, without undue tension in the flaps.
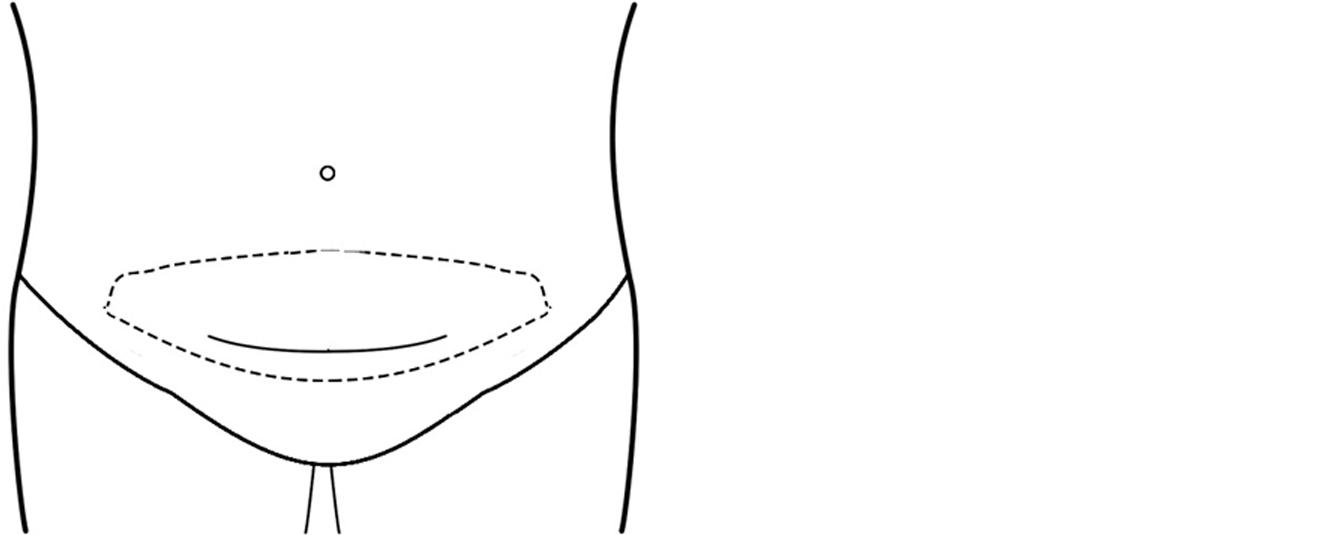
Figure 1b: Schematic representation of skin incision, including the previous scar. Note that the incision is not a perfect ellipse, to prevent “dog ears” laterally.
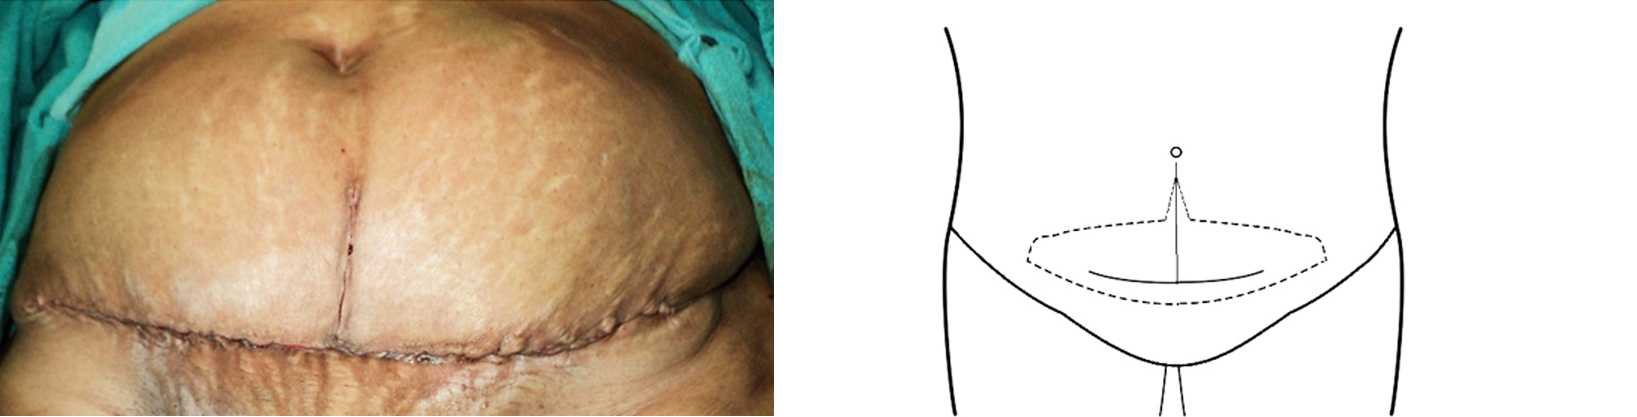
Figure 2: Inverted “T” incision to excise part of the thinned out previous midline scar, after closure. Schematic representation of inverted “T” incision to excise part of the thinned out previous midline scar, if necessary.
The skin incision is deepened to the external oblique aponeurosis using monopolar handheld diathermy. Superficial epigastric & superficial circumflex iliac vessels and the perforators are ligated using 2 ‘0’ polyglactin. Other vessels are controlled by monopolar or bipolar diathermy. Skin flaps are raised using diathermy.
Once the hernial sac is encountered, dissection is carried out carefully around the sac. The sac is opened after confirming there are no bowel adhesions, and the distal sac is excised along with the redundant skin. Sometimes doing this maneuver (opening of the sac) earlier saves time as it helps in identifying the extent of the sac and any intestinal adhesions. Care should be taken not to remove too much of the sac as it is required in the later part of the operation to separate the peritoneal cavity from the mesh. Once any intestinal adhesions are released, the intestines are returned to the peritoneal cavity and a wet mop is placed to prevent the intestines from spilling over through the hernial defect. If any gynecological surgery is required, it is done at this stage, through the hernial defect and enlarging it, if necessary, usually towards symphysis pubis.
Dissection is carried out cephalad. Once the umbilicus is reached, the umbilical scar is detached from the linea alba, after ensuring that there is no concomitant umbilical hernia containing intestine, close to the linea alba taking care not to injure the skin. Dissection is carried out to just beyond the umbilical scar. Rarely this may need to be extended further cephalad if the linea is not strong, in which case the dissection is carried out in the midline only and not extended too laterally, to preserve the perforators at the level of umbilicus. Throughout the procedure the flaps are moistened using warm saline. The extent of dissection is determined by the size & location of the defect and the condition of the abdominal wall musculature. Minimum of 5 cm around the edges of the defect should be dissected. However, in patients having lax abdominal muscles the dissection is carried out laterally to the anterior superior iliac spines, inferiorly up to the symphysis pubis and superiorly just beyond the umbilicus. Any omental and intestinal adhesions to the parietal peritoneum are released to facilitate vision and placement of sutures.
Incision is made all around the hernial sac where it meets the sheath (Figure 3a & b), to develop the space between the peritoneum and the sheath to facilitate placement of the sutures. If the sac is firmly adherent to the sheath, it should be gently dissected from the sheath until the neck of the hernia is reached (Figure 3a, b & c). Dissection is kept slightly towards the sheath, so that the peritoneum around the defect has enough thickness and doesn’t give rise to “buttonholes”. Where necessary multiple small defects are made into a single large defect by dissecting around all the defects. Once this is done the hemostasis is checked and the mops, if any, placed in the peritoneal cavity are removed.

Figure 3a,b: (a) Schematic diagram to show the area of dissection around the sac, separating it from the linea alba. (b) Schematic diagram to show the sac and sheath after dissection.
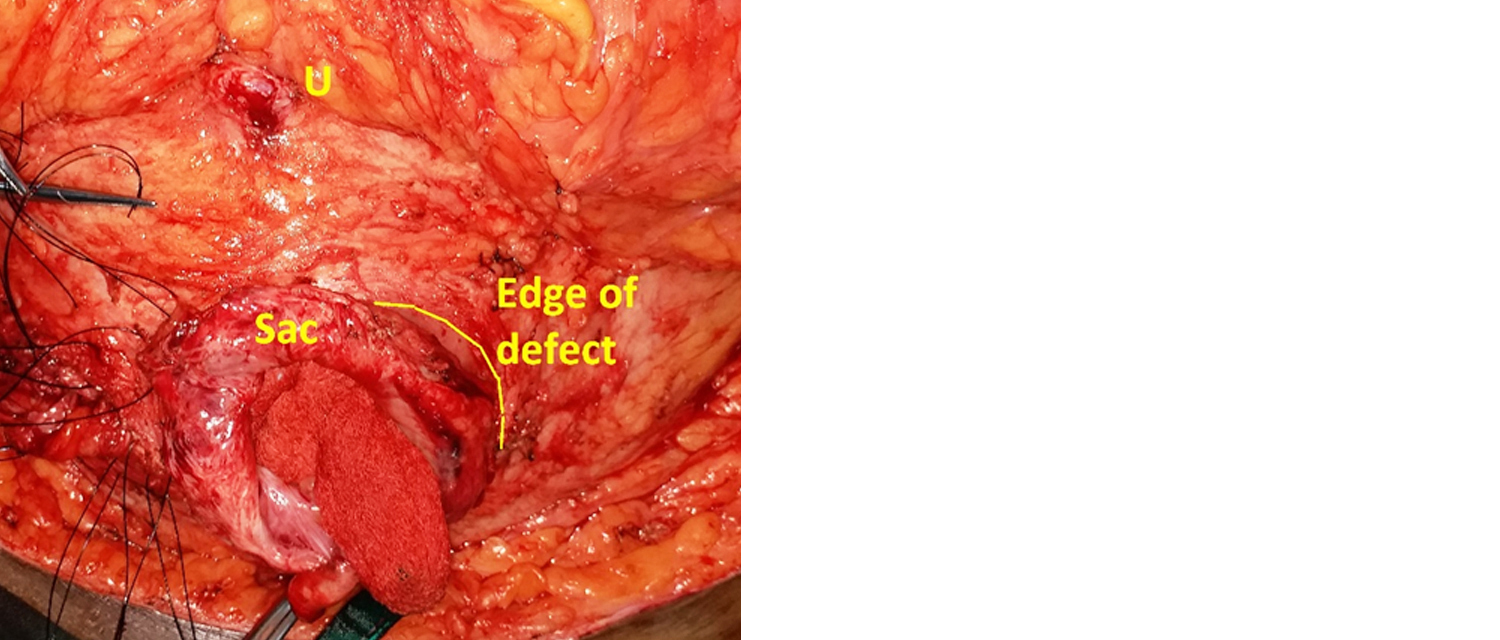
Figure 3c: Image showing extent of dissection, sac and edge of the defect. U = Umbilicus.
Polyamide ‘0’ suture on a half-circle round body needle is used. Loop suture is cut at one end, close to the needle, which will provide extra length suture. Four types of sutures are used to fix the mesh. For ease of description and understanding, the sutures are depicted as follows and the same alphabet is used in all the illustrations. Type T (Trans fascial) sutures are taken first, about 5 cm away from the edge of the defect and secured with a hemostat (Figure 4a & b). These sutures are taken laterally (T Lat), cephalad (T Sup) and caudad (T Inf).
First, lateral trans fascial sutures (T Lat) are taken in vertical direction, with a bite size of 10 mm. These do not traverse the peritoneum (Figure 4a). One or two or additional lateral trans fascial sutures are taken depending on the size of the defect. These are left untied and held in a hemostat. Rarely these sutures may go through the inferior epigastric vessels, which may be displaced due to divarication, and cause bleeding. This is easily controlled by tensing the suture and holding it in a hemostat close to the sheath. The bleeding usually stops by the time the sutures are tied. When this happens, while tying the knot it is important not to use the areas of suture held in the hemostat, as the suture is going to be weakened at those points.
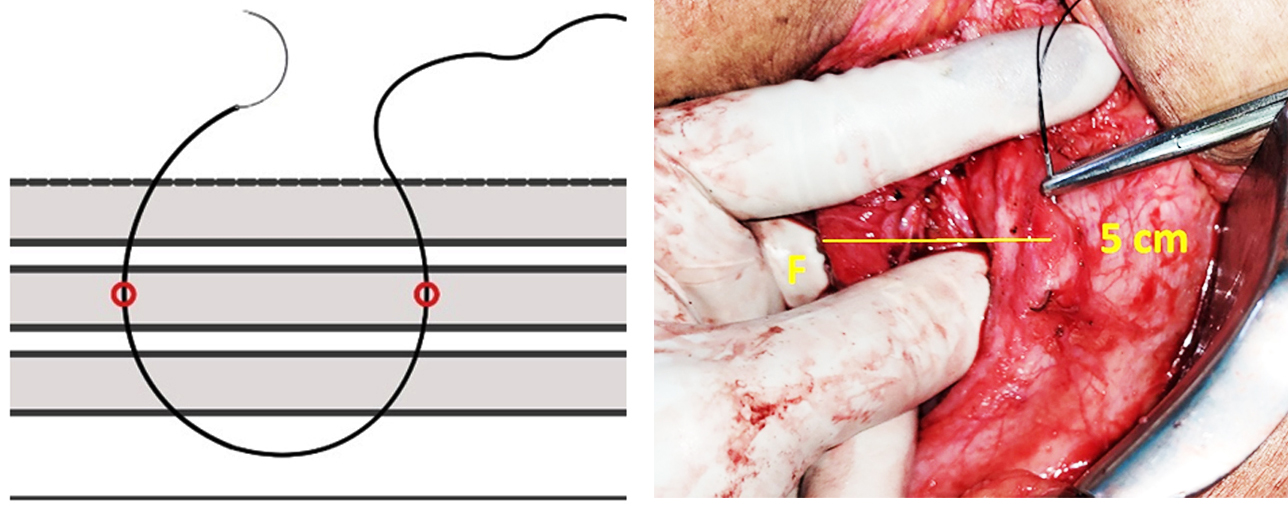
Figure 4a: Schematic representation of lateral trans fascial sutures (T Lat). Do not traverse the peritoneum. Note the finger (F) protecting the viscera while taking the trans fascial suture, 5 cm from the edge of the defect.
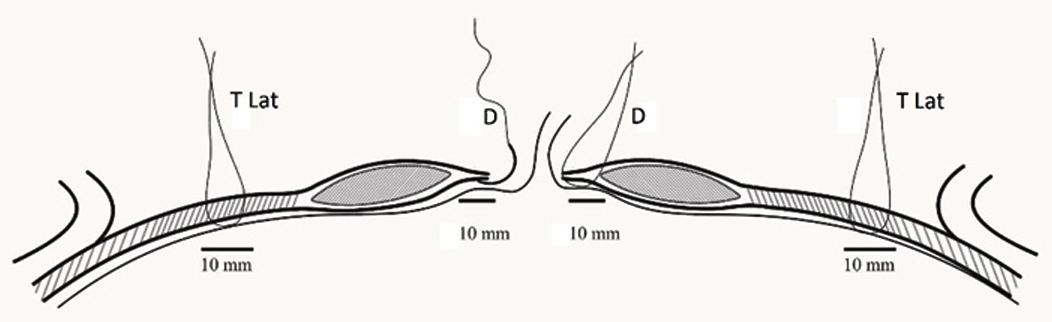
Figure 4b: Placement of trans fascial sutures (T Lat) and at the edge of the hernial defect (D). Trans fascial sutures (T Lat) should not traverse the peritoneum. The bites for both sutures should be at least 5 mm and ideally 10 mm. All these sutures are placed using finger guidance, before the hernial sac is closed.
Cephalad and caudad sutures are taken in horizontal direction. For the cephalad suture (T Sup) a bite of about 5 mm is taken and is not passed all the way through the sheath (Figure 5). This is because the linea in this area is generally thin and a full thickness bite may lead to weakness and hernia formation secondary to mesh contraction.
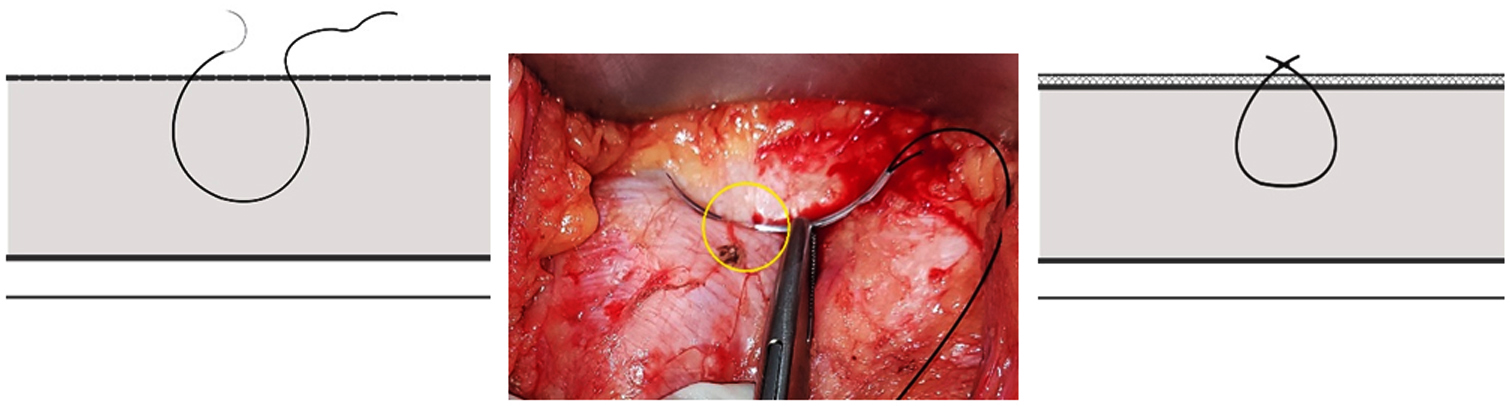
Figure 5: Cephalad trans fascial suture is not passed through the entire thickness of linea. Third picture depicts the suture after tying over the mesh.
For the caudad suture (T Inf), a bite of about 5 to 10 mm is taken and this usually traverses the peritoneum. Care should be taken not to allow a long loop of suture to form on the peritoneum, which may entrap the small intestine. Where the hernial defect is enlarged to facilitate gynecological surgery and/or adhesiolysis, (or the area of umbilicus or additional small defects), full thickness trans fascial sutures, traversing the peritoneum (T Inf) are taken. Some of the sutures are tied and left long to be passed through the mesh and tied over the mesh again (Figure 6a & b left images). This is to prevent the intestines from spilling over or getting caught in the polyamide loops. Other sutures are left untied and held in a hemostat.
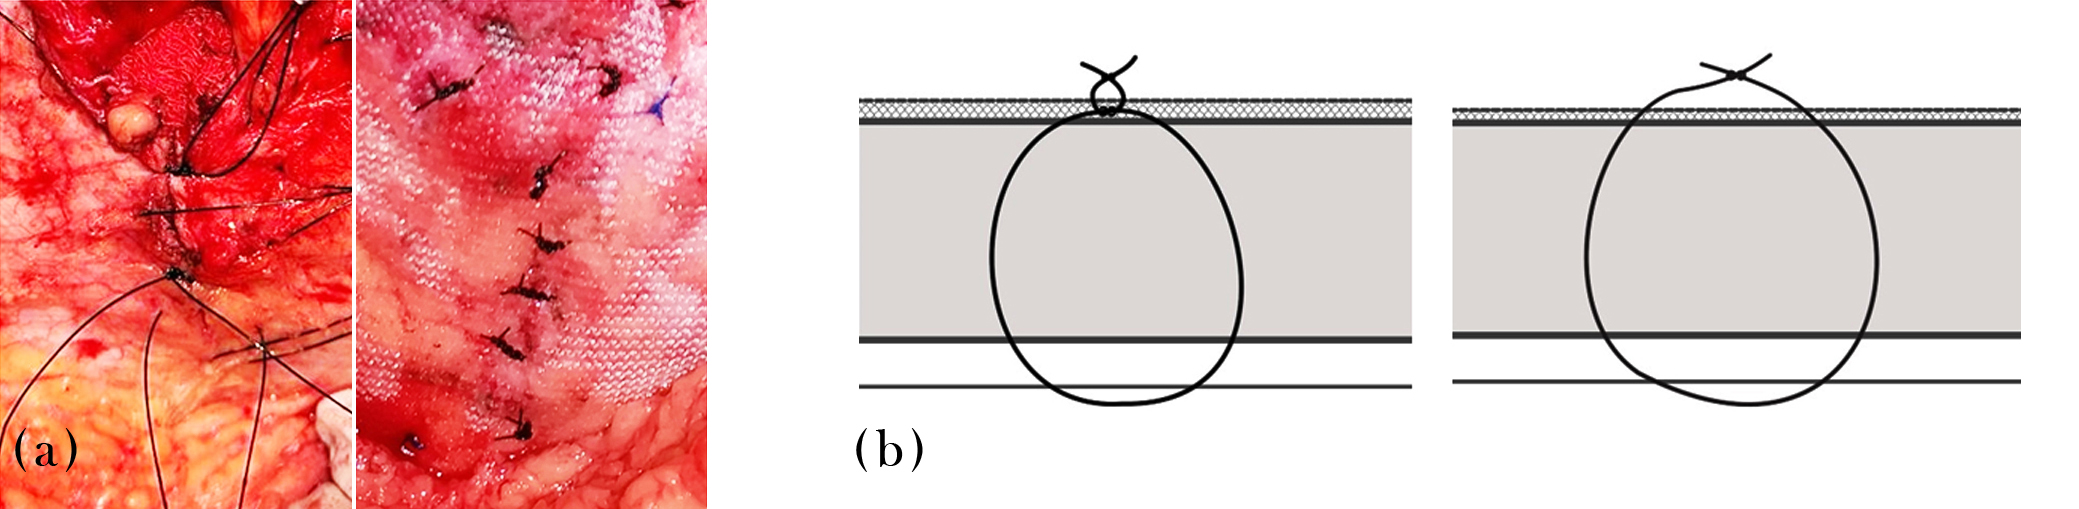
Figure 6: (a) Left – T-inf sutures, some tied and some left untied. Right: All sutures passed through the mesh and tied over the mesh. (b) Left – schematic representation of sutures tied over linea alba, then passed through the mesh and tied over the mesh again. Right – schematic representation of the sutures left untied initially, passed through the mesh and tied over the mesh, like majority of the sutures in this technique.
Then sutures are taken all around the edge of the hernial defect (Type D sutures. Figure 7), 10 mm from the edge of the defect and with about 1cm gap between the sutures, left untied and secured with a hemostat.
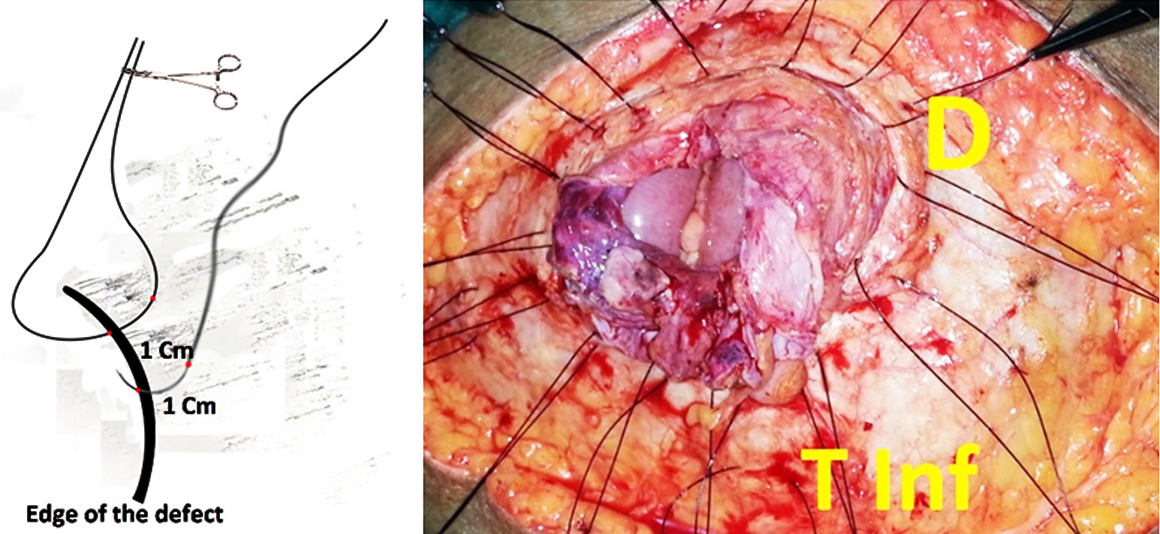
Figure 7: Type D sutures at the edge of the defect, 1cm from the edge and 1cm apart.
The redundant hernial sac is excised, and the sac closed using 2 ‘0’ polyglactin suture. It is important to ensure that the sac (peritoneum) is well vascularized and thick enough to separate the mesh from the viscera adequately. Sometimes the sac may be closed in a “double-breasted suit” manor to give additional thickness, taking care not to pass the sutures through intestines. Any defects in the peritoneum/sac near the hernial defect (neck of the sac) caused during initial dissection must be closed to prevent the mesh coming in contact with the viscera.
Rarely where the sac is not healthy, and closure is not possible, relaxing incisions may be given in anterior rectus sheath to facilitate the closure of the peritoneal defect. This area of relaxing incisions should be covered by the mesh adequately when mesh is placed in the later part of the operation. No attempt is made to close the fascial defect. If a defect is present where the umbilical scar is detached from linea alba (or any other small defects), sutures (Type T Inf) are placed and left untied. The defect near the umbilical scar may be preexisting or due to concomitant laparoscopic cholecystectomy.
The hemostats securing the untied sutures are arranged in their position so that they do not entangle with each other or cross the midline. Surgeon and assistants change the outer gloves at this stage and the exposed skin is covered using mops or towels. Care is taken to prevent the mesh from coming in contact with the skin. Medium weight mesh is used. Size of the mesh is determined at this stage by using a measuring scale. In patients having lax abdominal wall musculature and large sub umbilical defects, a 30 x 30 cm mesh is used, which is trimmed as necessary. The inferior margin of the mesh is fixed to the symphysis pubis using polyamide ‘0’ sutures, at least 5mm from the edge of the mesh, securing to the periosteum and taking care not to pass the needle through the bone (Type P sutures. Figure 8).
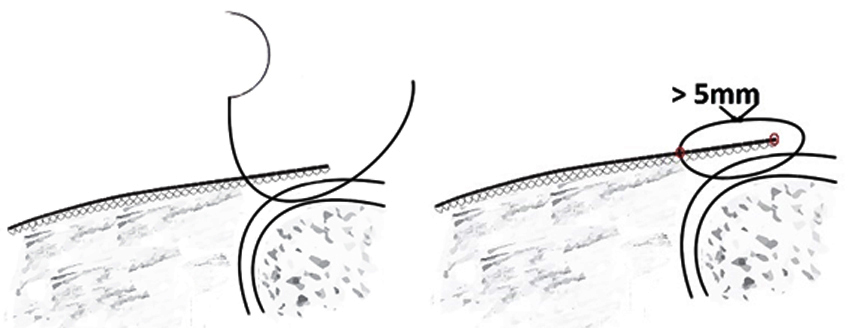
Figure 8: Type P sutures through the periosteum of symphysis pubis and anterior superior iliac spine.
The mesh is now stretched gently and the cranial most suture in the linea alba is passed through the mesh and tied over the mesh. The sutures are passed through the mesh with about 2 – 5 mm gap in between so that there is no crumpling of the mesh when the suture is tied (Figure 9a & b). Excess mesh is cut at least 10 mm cephalad to this suture and discarded. Sutures securing the edges of the defect (Type D) are now serially tied passing through the mesh and taking care not to crumple the mesh.

Figure 9: (a) Preplaced sutures around the edge of the defect are tied first. These are passed through the mesh at a distance of 2 – 5 mm taking care not to crumple the mesh once they are tied. Tran facial sutures are tied next again taking the same precautions. The mesh should ideally extend to 5 cms from the edge of the defect. (b) Schematic representation of suture passing through the abdominal wall with a bite size of about 10 mm and the suture being passed through the mesh with a gap of about 2 to 5 mm to prevent crumpling of the mesh.
Then remaining sutures in the midline (at the umbilical scar and others) are tied next. All the sutures to be passed through the mesh and secured over the mesh (Figure 6 & 9b). The final appearance is as in Figure 10 for the defect extended inferiorly to facilitate gynecological surgery.
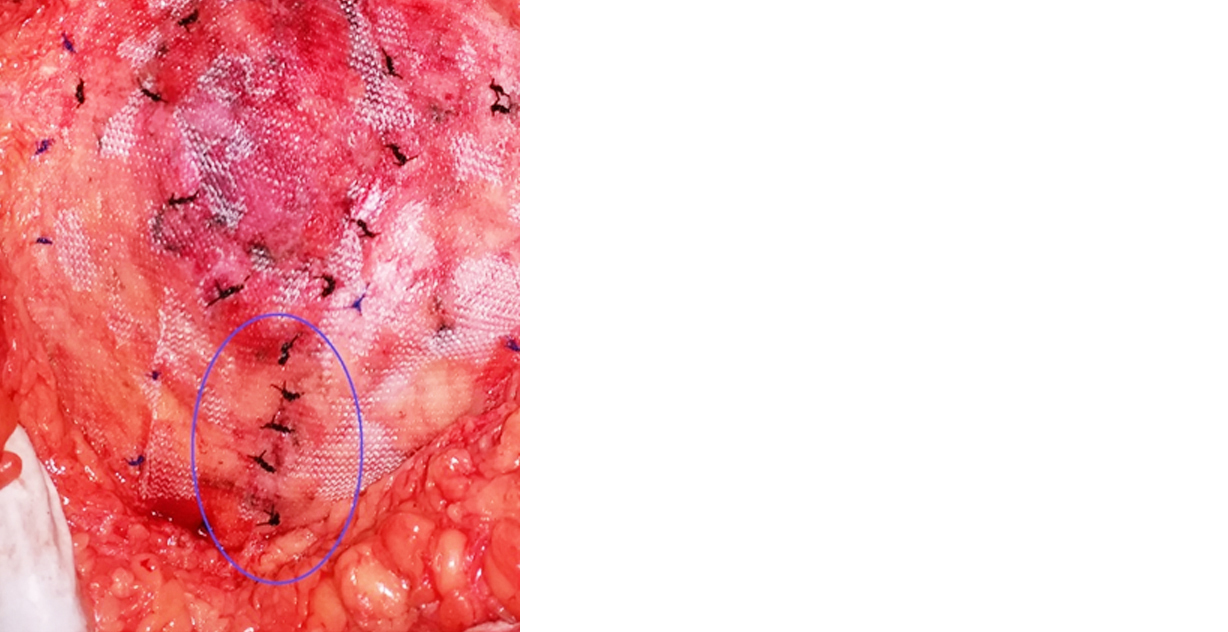
Figure 10: Hernial defect was extended towards symphysis pubis to facilitate concomitant hysterectomy.
The extended wound is reapproximated and the sutures are tied over the mesh. Then, lateral trans fascial sutures (T Lat) are tied (Figure 9b). These are tied a little loosely to prevent any nerve entrapment. The mesh is gently stretched and secured to the periosteum over the anterior superior iliac spine (Type P sutures. Figure 8).
Excess mesh is trimmed, and the edges are secured to sheath using 2 ‘0’ Polypropylene suture on half circle round body needle, taking care not to go too deep and include the viscera, where the sheath is thin (Type C sutures, Figure 11). Inferiorly, mesh is fixed to inguinal ligament. Type C sutures do not afford strength to the repair and are to prevent the mesh from rolling. These are placed at a distance of about 2 to 5cm from each other as necessary.
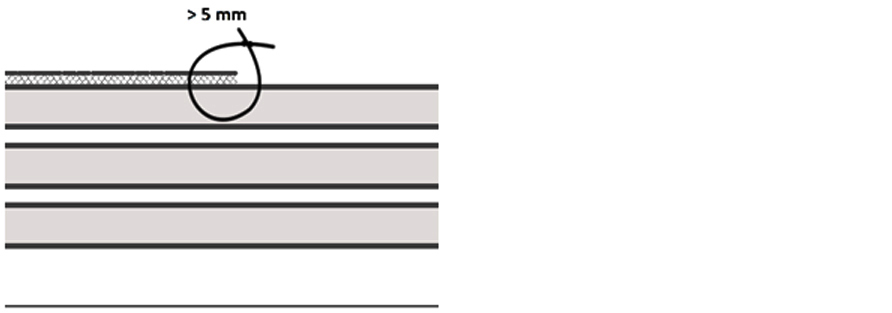
Figure 11: Schematic representation of type C sutures to secure the edges of the mesh.
The mesh may need to be cut radially and overlapped in 1 or 2 places to accommodate the flat mesh to abdominal wall contour (Figure 12a & b).
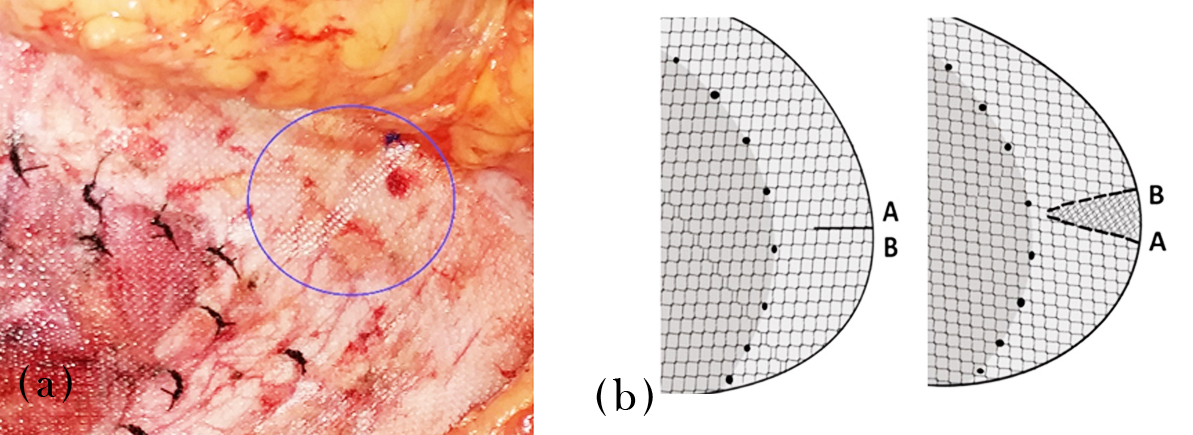
Figure 12: (a) Radial cut made in the mesh and the edges overlapped to accommodate the abdominal wall contour. (b) Schematic representation.
Final appearance after securing the mesh is depicted in Figure 13a & b. Any excess skin (or if the skin edges appear unhealthy), further skin is excised as necessary at this stage. The umbilical scar is secured to the mesh in the new position (taking into account the excised loose skin and fat) using 2 0’ Polypropylene suture (Figure 14).
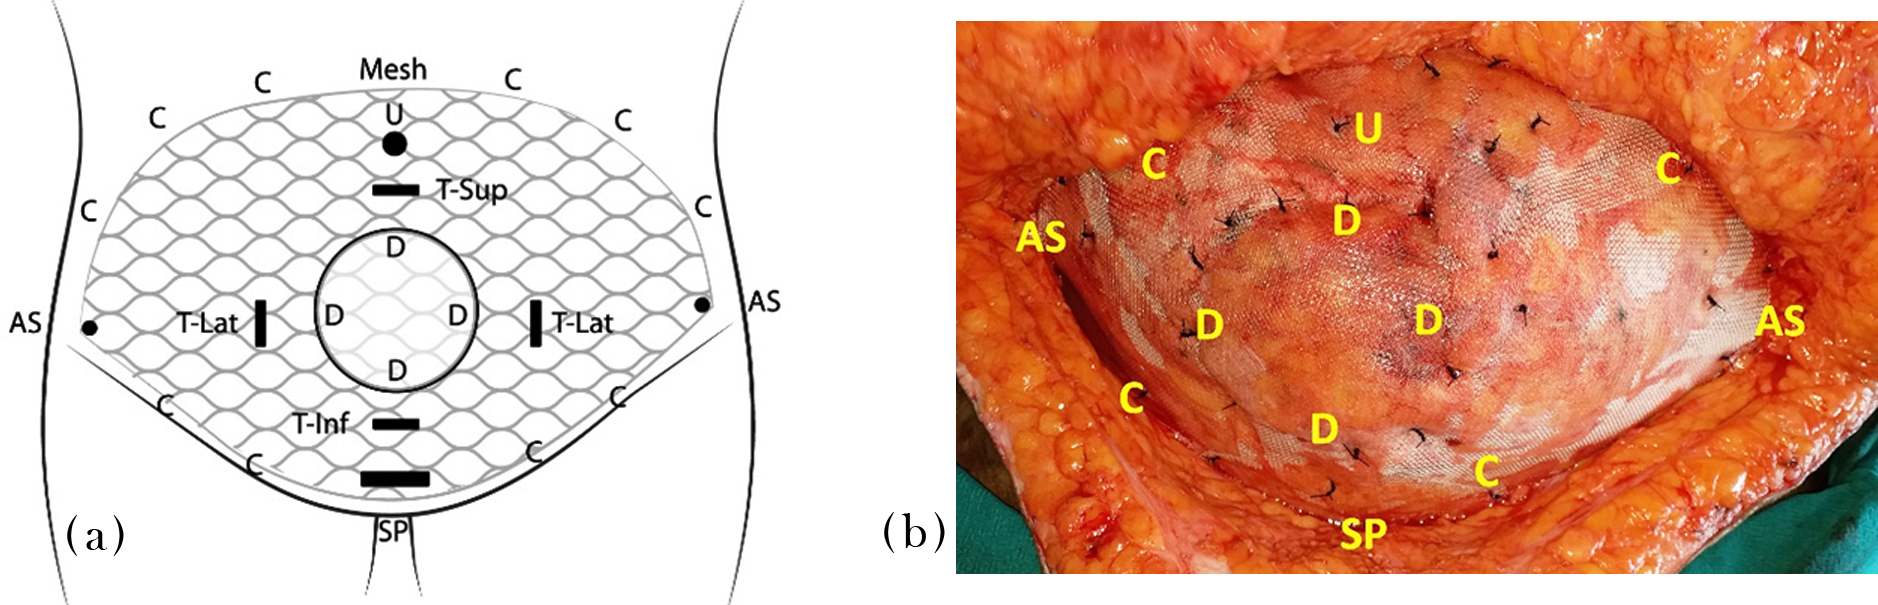
Figure 13: (a) Schematic representation after tying all the sutures and securing the mesh inplace. U – Umbilicus, AS – Anterior superior iliac spine, SP – Symphysis pubis. Different types of sutures as described in the text. (b) Appearance after tying all the sutures and securing the mesh. Legend as in Figure 13a.
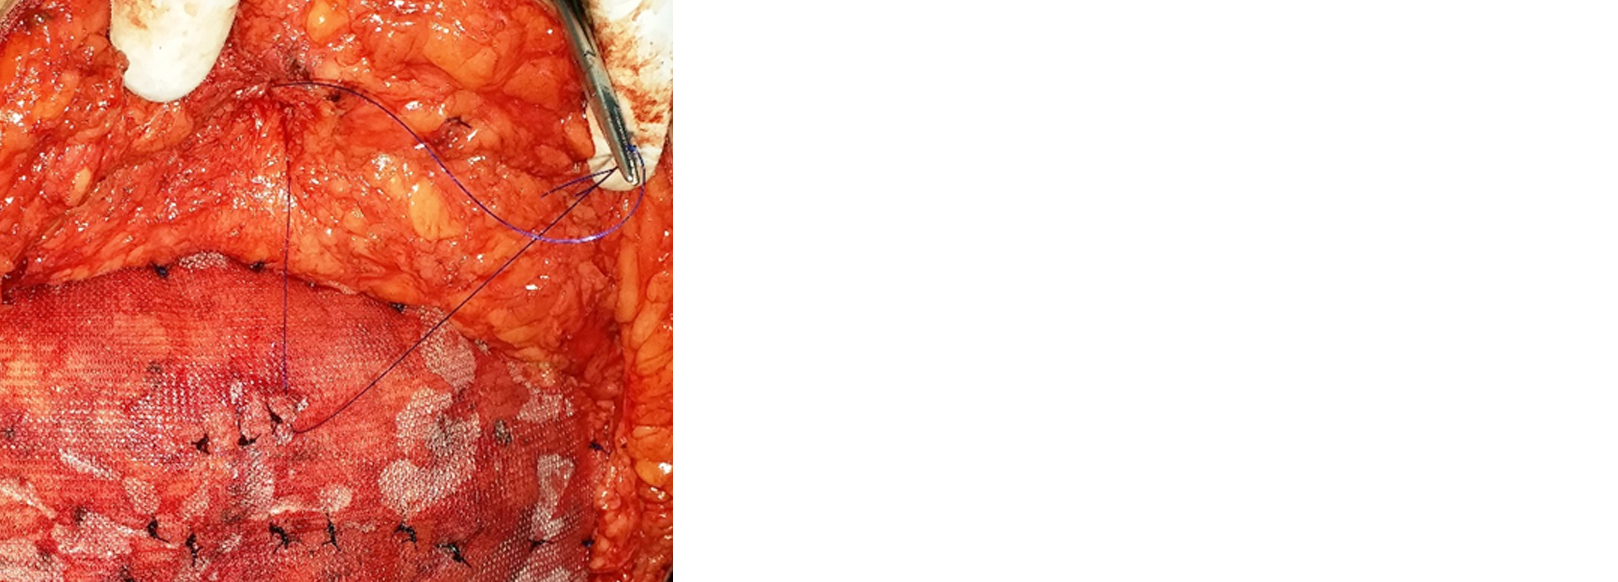
Figure 14: Umbilical scar is secured to the mesh using 2 ‘0’ Polypropylene suture.
Wound is washed with warm saline. 14 Fr suction drain is placed in the lower flap and secured to skin using ‘1’ silk suture on a cutting needle. The viability of the flaps is checked, and edges trimmed if necessary. Hemostasis is checked the final time. Scarpa’s fascia is reapproximated using 2 ‘0’ polyglactin interrupted sutures. Skin is closed using subcuticular 3 ‘0’ polyglyceparone suture on a cutting needle, starting at both lateral ends, tying in the middle and burying the knot (Figure 2 & 15). Generally, there is some disparity in the size of the superior and inferior flaps. This is overcome by taking slightly larger bites in the larger flap, which usually is the superior flap. It is important not to tighten the subcuticular suture excessively as it may snap due to the weight of the flaps. Two or three interrupted sutures may be taken in the end to give extra support. The wound is cleaned and dressed. Soft abdominal binder is applied without undue pressure.
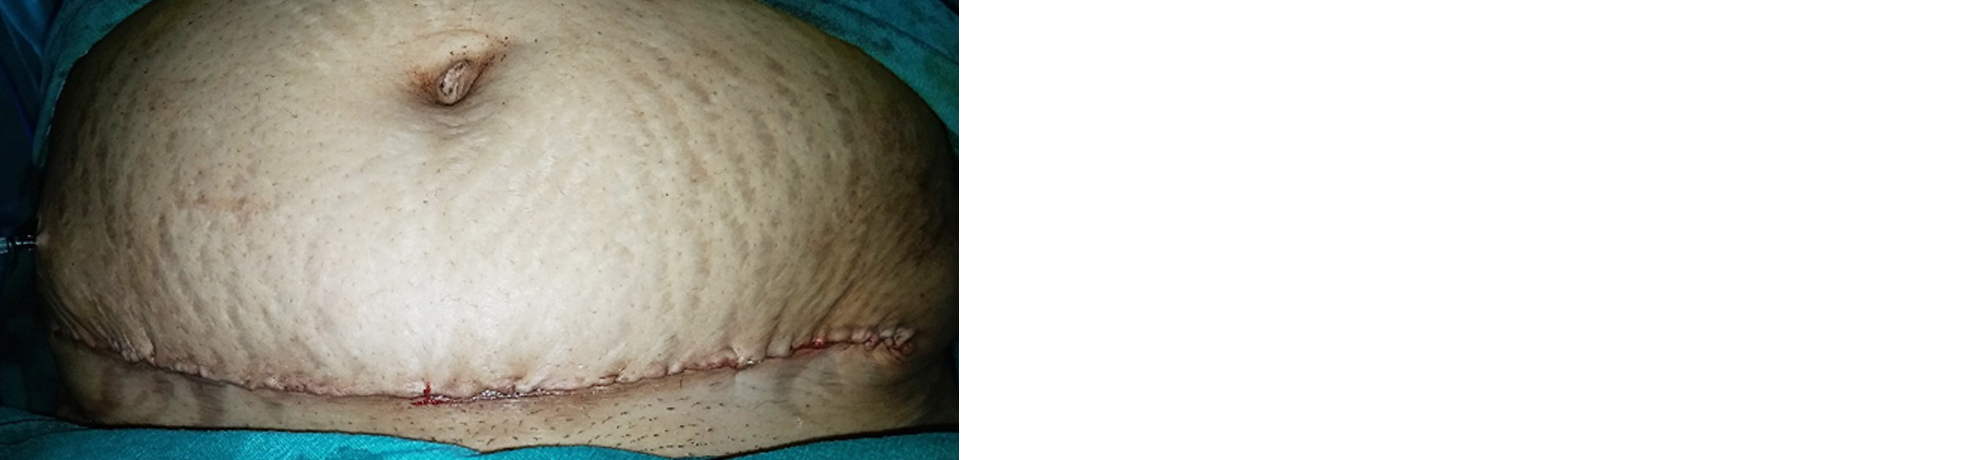
Figure 15: Wound after closure.
In patients having smaller defects, less than 5cms, and good abdominal wall musculature, smaller mesh is used, with an overlap of at least 5 cm all around the defect. In this group the mesh is not extended up to the anterior superior iliac spine laterally and to symphysis pubis inferiorly (Figure 16). The remaining procedure is the same as described above.
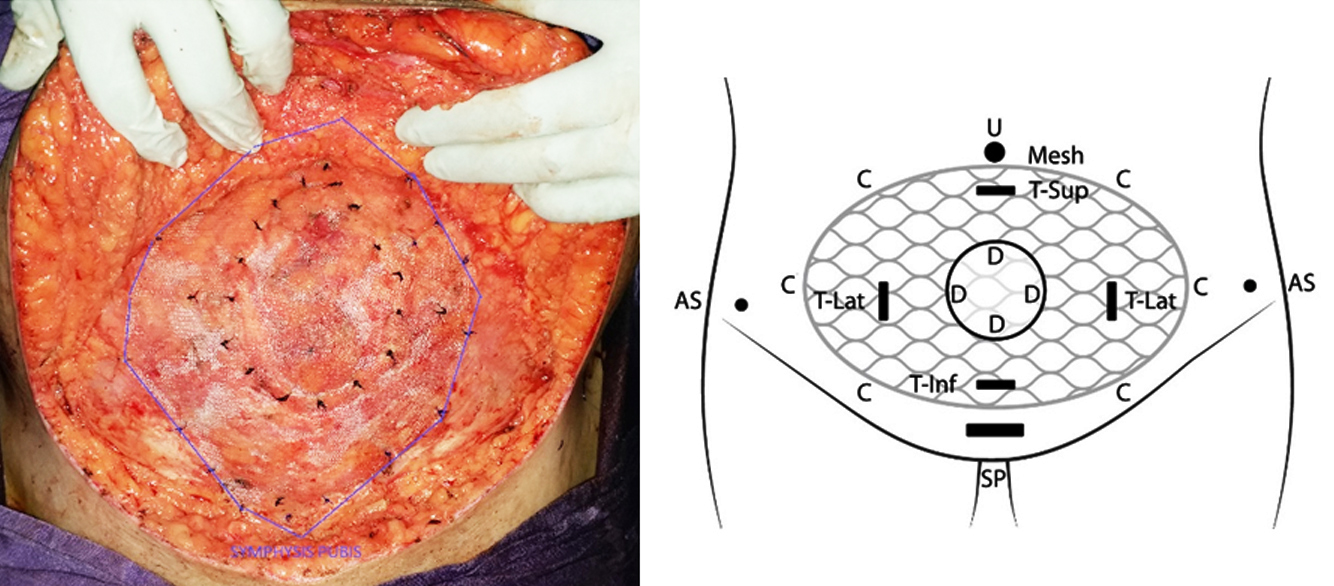
Figure 16: In patients with good abdominal muscles, dissection is not carried till anterior superior iliac spine. Schematic representation of using a smaller mesh. Legend as in Figure 13a.
Post operative care
Post operatively adequate hydration and oxygenation is ensured to prevent hypotension and hypoxia. Patients are ambulated on the first post-operative day. Adequate analgesia and chest physiotherapy are given. The urinary catheter is removed once the patient is ambulating comfortably. Oral liquids are allowed on the evening of surgery and increased to normal diet as tolerated, usually by second or third post-operative day. The wound is checked daily. Once the patient has passed motion and the requirement for intravenous analgesia is over, wound drain is removed and discharged, usually on 4th or 5th post-operative day. Patients are advised to wear the soft abdominal binder for a month during daytime. Wound dressings are done as necessary in the outpatient department usually for a week and then followed at regular intervals.
Discussion
This procedure is a combination of inlay & on lay methods and abdominal panniculectomy. It can be used for almost all ventral hernias in the midline [5]. It takes a little longer as the elliptical incision means, division of skin and subcutaneous fat in two places as compared to one straight incision. In addition to being cosmetic, the panniculectomy helps in removing the loose skin and areolar tissue, thereby reducing the drag on the mesh and giving some additional support to the mesh. It is most suitable for multiparous women with sub umblical hernias, as this reinforces the entire lower abdomen. This is an excellent procedure, especially for multiparous women with sub umbilical hernias. It gives good cosmesis (Figure 17a, b & c), learning curve is low, does not require any special equipment and the cost is considerably less.
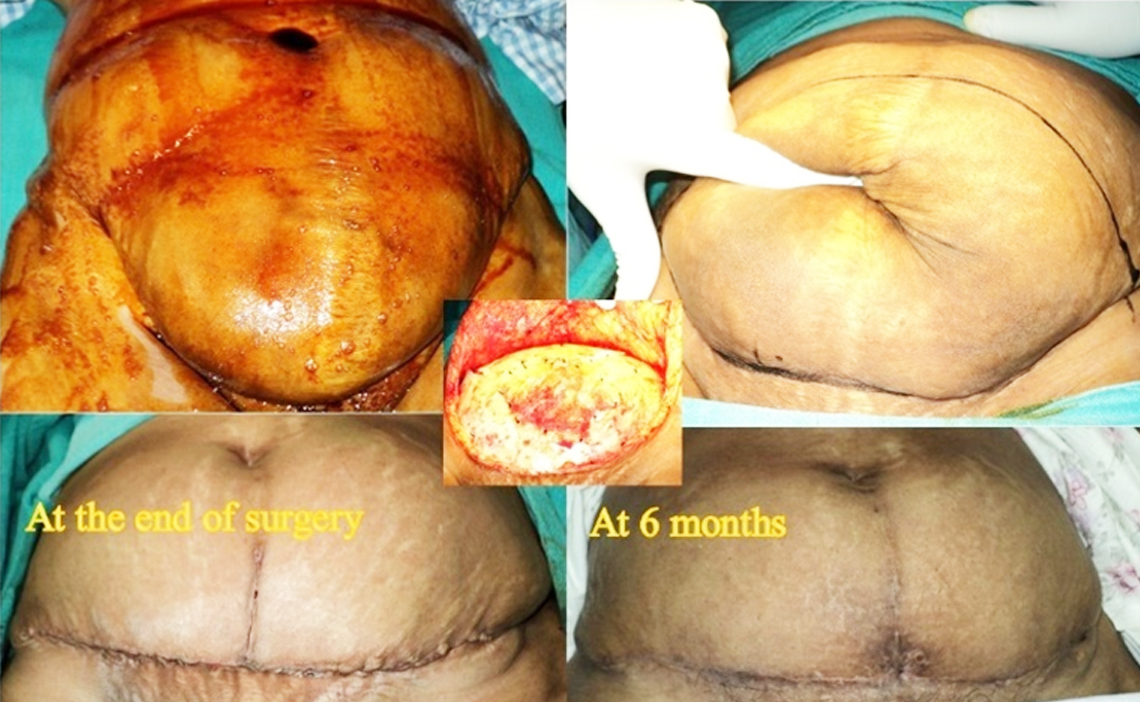
Figure 17a: Long term appearance.
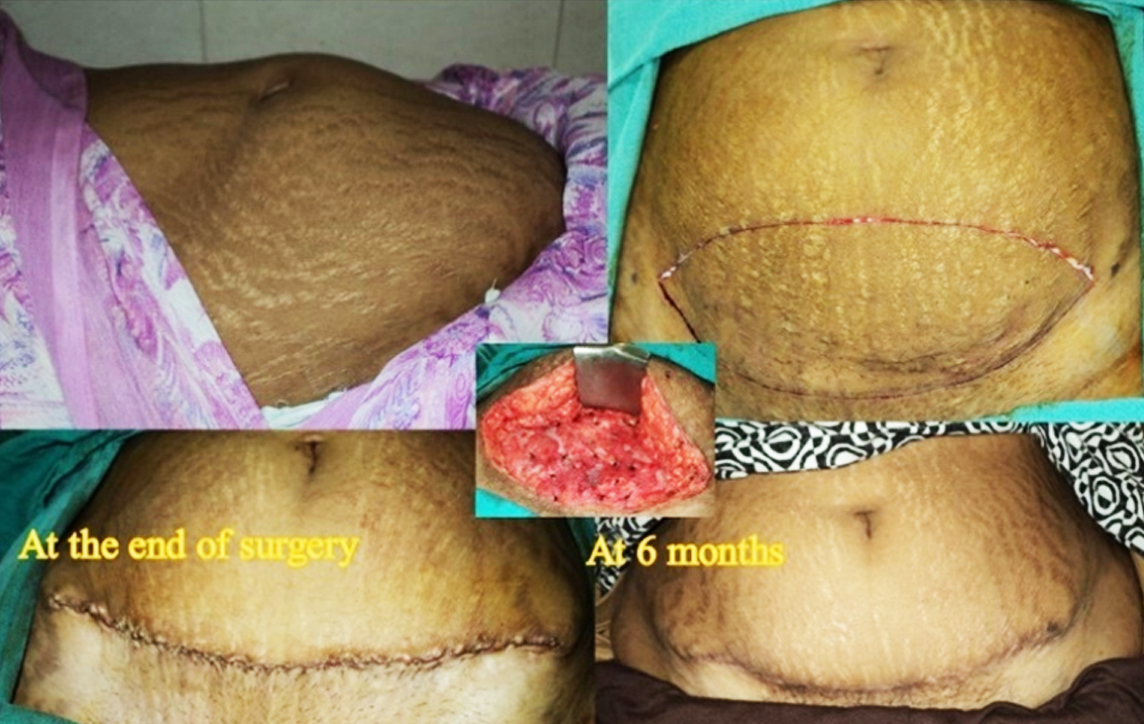
Figure 17b: Long term appearance.
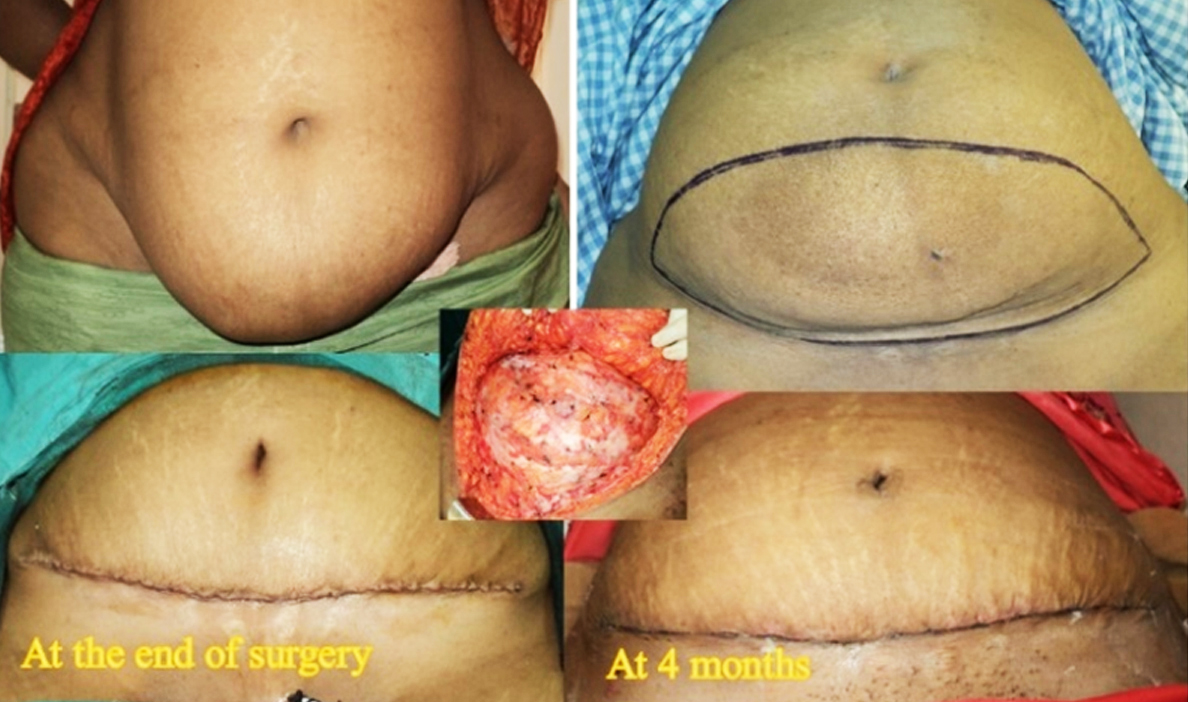
Figure 17c: Long term appearance.
Being open surgery, pain is more and providing adequate analgesia is important. However, it is presumed that pain would be less compared to traditional open incisional hernia repair, as this is a truly tension free repair. Comparative studies are needed to establish this. In our series of 208 patients, there are no deaths. Significant complications included necrosis of the wound edges which required wound care for prolonged period in 2 patients, 1% (Figure 18).
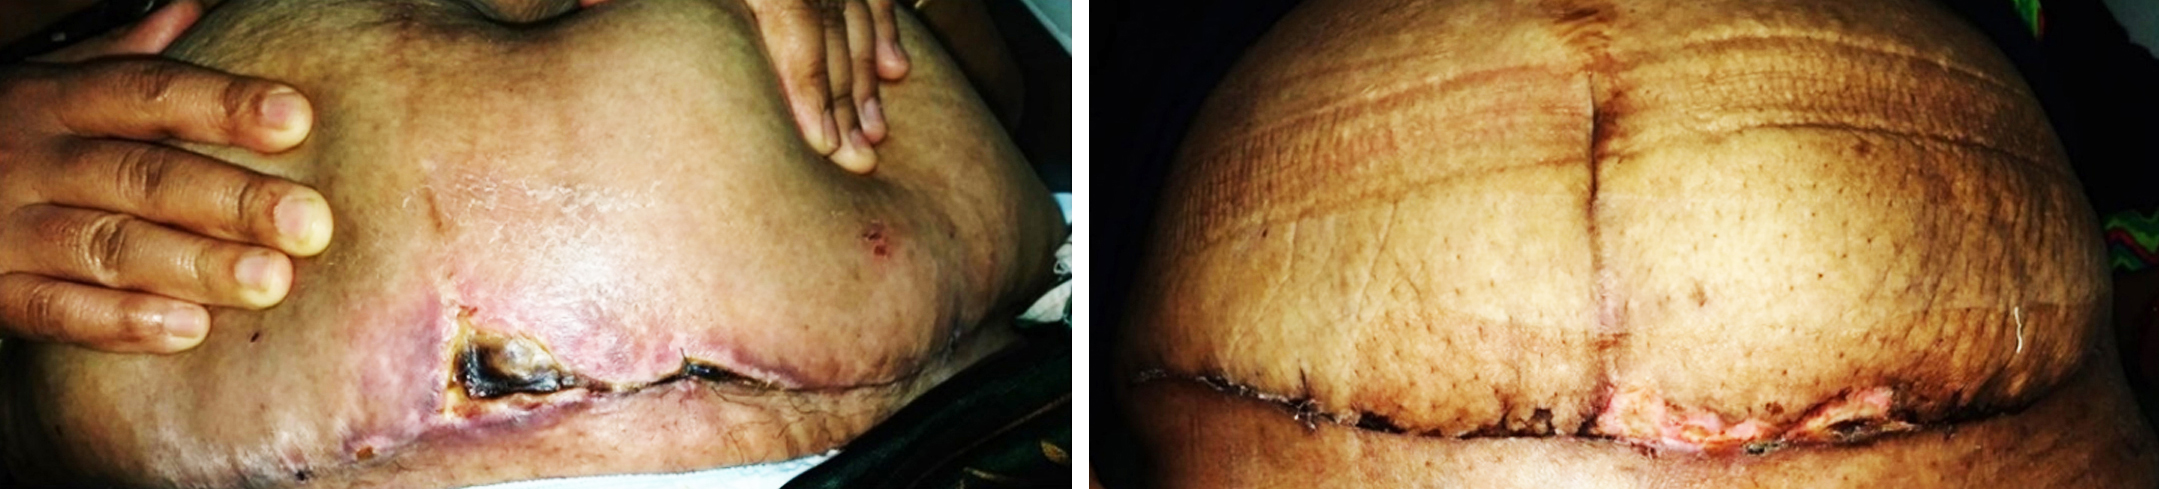
Figure 18: Necrosis at wound edges.
In our series, incidence of seroma requiring aspiration is 3%, which is much less than anticipated for open incisional hernia repair. This could be due to the judicious use of diathermy and extra care taken in tissue handling. None of the patients required re-exploration in the immediate post-operative period. One patient had a delayed mesh infection requiring removal of mesh two years after surgery. One patient had enterocutaneous fistula after 6 years, requiring removal of the mesh and intestinal resection anastomosis. The recurrence rate is low at 2% with an average follow up of 9 years. The recurrences were noted at the cranial edge of the mesh.
Longer follow up may unveil further recurrences [6]. Still the recurrence rate in this series is much less compared to the historical rates of 12.3% at 5 years and 23.1% at 13 years follow-up [7]. The recurrence rate is less than reported from specialized AWS (Abdominal wall surgery) unit [8]. In this series, the size of the defect ranged from 2cm to 14cm and many of the hernias do not fall into the category that require component separation [9]. Most of the currently advocated methods of incisional hernia repair place the mesh in a sublay position, as this is shown to reduce the risk of seroma and mesh infection. Many surgeons do not feel comfortable placing the mesh in the subcutaneous space for these reasons. Another criticism about this technique is that the abdominal wall is considerably thin at the defect, comprising peritoneum & mesh only, compared to the rest of the abdominal wall and that this may lead to recurrent herniation. However, this was not our experience of both these issues as discussed earlier.
The limitation of this technique is that it is from a single center and in the hands of a single surgeon. Obviously, more studies are required to establish the reproducibility of these results in other centers.
Conclusion
This technique can be used for any size of hernia defect. It is especially suitable to parous women with loose panniculus and sub-umbilical hernias. It is truly tension free repair. Most surgeons practicing open incisional hernia repair can adapt to this technique quite easily. It requires utmost care in adhering to strict aseptic technique, gentle tissue handling, and judicious use of diathermy. This is not a panacea for all incisional hernias but should become a part of the armamentarium of any hernia surgeon. It is suggested that initially small sub umbilical hernias are done using this technique and perhaps take the help of a plastic surgeon.
Acknowledgements
I am extremely grateful to my organization KIMS Hospitals where this technique is developed, and its founder Dr B Bhaskar Rao for having provided me with a platform to practice in India for the past two decades. Heartfelt gratitude to all the patients, my parents, family, friends, colleagues, and hospital staff. I wish to express my indebtedness to all my teachers, especially my mentors Mr Wyn Morgan (Lancaster UK), Mr Ravi Srinivasan (Blackpool UK) and Mr Patrick Jeffery (Dorchester UK) from whom I have learnt most of my surgical skills. Thanks to my plastic surgery colleagues Dr Srinivas Surapaneni and Dr Hemant Nannapuneni from whom I got the panniculectomy skills. Special thanks to Prof G Raghavendra Prasad for his critical review and guidance in preparing this manuscript.
Conflicts of interest
Author declares no conflicts of interest.